Cart
Sub-Total: $0.00
In a real emergency, things do not unfold in a clean, controlled way. They happen fast, they get messy, and people often do the wrong thing simply because they do not know what to do first. That is where the MARCH protocol comes in. It gives you a structured way to approach trauma so you are not guessing or reacting emotionally. Instead of bouncing from one problem to another, you move through a sequence that prioritizes what will kill someone the fastest. That alone is what makes this system so effective. It is not about doing everything. It is about doing the right things in the right order when time is working against you.
The MARCH protocol comes out of battlefield medicine, but it applies just as much to everyday life. Car accidents, chainsaw injuries, bad falls, backcountry incidents, or even something as simple as a deep cut at home can turn serious very quickly. The reality is that most people are not going to have immediate access to advanced medical care. There is always a gap between when something happens and when help arrives. What happens in that gap is what determines the outcome. MARCH gives you a way to manage that gap with clarity instead of panic.
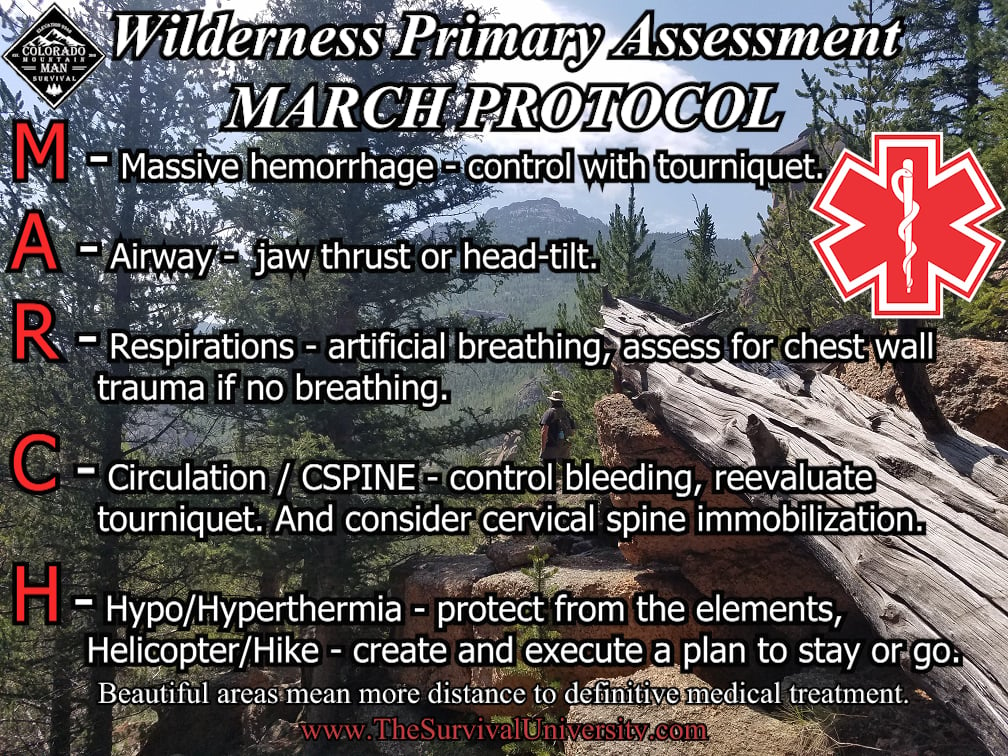
What Does MARCH Stand For?
Massive hemorrhage is always the first priority because it is the fastest killer in trauma that you can actually do something about. A person can lose a life-threatening amount of blood in just a few minutes, and once that process starts, it does not slow down on its own. If you miss this step or hesitate, nothing else you do afterward will matter. This is why MARCH starts here every single time.
A tourniquet is the go-to tool for severe bleeding on the arms or legs. It should be placed high and tight, and it should be tightened until the bleeding stops completely. This is where people often struggle because they are worried about causing damage or pain. The reality is that uncontrolled bleeding will kill someone far faster than a properly applied tourniquet ever will. If a tourniquet is not an option due to the location of the wound, then direct pressure becomes your primary method. That means firm, sustained pressure using gauze, clothing, or anything you have available.
In more severe cases, wound packing may be required. This involves pushing material deep into the wound to create internal pressure against the bleeding source. It is uncomfortable, it is invasive, and it is extremely effective when done correctly. There are even situations where you may need to use your fingers to locate and compress a bleeding vessel directly. None of this is clean or easy, but it works. The goal here is simple. Stop the bleeding before the patient runs out of time.
Key Tip: Time is critical—act fast to minimize blood loss.
Once massive bleeding is controlled, the next priority is making sure the patient has a clear airway. Without oxygen, the brain begins to suffer damage within minutes. This step is often overlooked because people assume that if someone is conscious, they are fine. That assumption can get people into trouble.
Opening the airway can be as simple as positioning the head correctly. The head-tilt chin lift is commonly used, while a jaw thrust may be more appropriate in situations where a spinal injury is suspected. If there is something visible blocking the airway, it should be removed carefully. However, blindly sweeping your fingers into the mouth is a mistake that can push obstructions deeper and make the situation worse.
If the patient is talking, that is a strong indicator that the airway is currently open and functioning. That said, conditions can change quickly. Swelling, blood, vomit, or changes in consciousness can all compromise the airway without warning. Positioning the patient on their side, especially if they are unconscious but still breathing, can help maintain an open airway and reduce the risk of aspiration. This step is about staying ahead of problems, not reacting after they happen.
Key Tip: If the patient is talking, they can breath but continue to assess often if they were choking and stop talking.
After confirming that the airway is open, the focus shifts to how well the patient is actually breathing. Breathing is more than just air moving in and out. It needs to be effective enough to support the body’s oxygen demands. This is where you take a closer look at the chest, the rhythm of breathing, and any signs that something is not right.
You are looking for normal chest rise, steady breathing patterns, and the absence of obvious trauma. If the patient is not breathing or is struggling to breathe, you may need to assist with ventilation. Chest injuries are particularly dangerous because they can interfere with the body’s ability to move air effectively. Open chest wounds, often referred to as sucking chest wounds, allow air to enter the chest cavity and collapse the lung. These need to be sealed quickly using a chest seal or an improvised solution that prevents air from being drawn in.
Even injuries that are not immediately obvious can develop into serious respiratory issues. Bruising, internal damage, or a developing pneumothorax can all worsen over time. This is why continuous reassessment is part of the process. You are not just checking once and moving on. You are watching for changes and adjusting as needed.
Key Tip: Look, listen, and feel for signs of breathing to evaluate the need for immediate intervention.
Once the immediate threats of bleeding and breathing are addressed, you shift into a broader assessment of circulation and potential spinal injuries. This step is about identifying anything else that could compromise the patient’s ability to survive.
Start by reassessing any bleeding that was previously controlled. A tourniquet should have completely stopped blood flow to the affected limb. If it has not, it needs to be tightened or adjusted. Then look for additional injuries that may not have been obvious at first glance. Trauma patients often have multiple injuries, and it is easy to miss something if you are not actively looking.
Circulation can be evaluated through pulse, skin color, temperature, and mental status. A weak or rapid pulse, pale or clammy skin, and changes in consciousness can all indicate that the body is struggling to maintain adequate blood flow. At the same time, consider the mechanism of injury. If the patient experienced a fall, a collision, or any force that could affect the spine, you need to limit unnecessary movement and stabilize the head and neck as much as possible.
This is not about freezing the situation and refusing to act. It is about being deliberate. You still treat the patient, but you do it with an awareness that improper movement can make certain injuries worse.
Key Tip: Monitor the patient’s pulse to ensure adequate blood flow is being maintained. If an tourniquet is applied, there should be no blood flow to that extremity. That's the point! Don't take it off!
The final step in MARCH is often underestimated, but it plays a major role in whether a patient survives. Trauma disrupts the body’s ability to regulate temperature, and even mild changes can create serious complications. Hypothermia, in particular, can set in quickly and interfere with the body’s ability to clot blood, which directly impacts survival.
Keeping the patient warm starts with insulating them from the ground. The ground pulls heat away from the body faster than most people realize. Adding layers, covering them with jackets or blankets, and protecting them from wind and moisture all make a difference. This applies even in environments that do not feel cold. Trauma changes how the body responds, and heat loss becomes a real problem.
On the other end of the spectrum, hyperthermia can also be a concern in hot environments. Overheating places additional stress on the body and can accelerate decline. Moving the patient into shade, reducing exposure, and managing hydration if appropriate are all part of this process.
This is also where you start making decisions about evacuation. Are you calling for help, waiting for rescue, or preparing to move the patient yourself? Each option comes with its own risks and challenges. What matters is that you make a decision based on the situation rather than delaying and hoping things improve on their own.
The strength of the MARCH protocol is that it removes hesitation and replaces it with direction. In high-stress situations, people tend to either freeze or jump from one task to another without a clear plan. That leads to missed priorities and wasted time. MARCH keeps you focused on what actually matters in that moment.
It also helps prevent one of the most common mistakes in emergency care, which is focusing on the wrong problem. People often get drawn to injuries that look dramatic but are not immediately life-threatening, while missing something like severe bleeding that is quietly killing the patient. By following a structured approach, you reduce the chances of making that mistake.
This is not just for medics or military personnel. The same principles apply in everyday situations that most people will encounter at some point in their lives. Whether it is a car accident, a fall in the mountains, a worksite injury, or something as simple as a bad cut at home, the ability to respond effectively in those first few minutes changes outcomes.
Most emergencies happen in places where help is not immediately available. Even in urban environments, response times are not instant. In more remote settings, that delay becomes even longer. Knowing how to manage a situation during that window is what makes the difference between someone stabilizing and someone deteriorating.
Understanding the MARCH protocol is a starting point, but real confidence comes from applying it under pressure. Reading about it builds awareness, but hands-on experience is what builds skill. You need to practice making decisions, applying techniques, and working through scenarios where things do not go perfectly.
When something goes wrong, you will not have time to think through every step from scratch. You will fall back on what you have practiced and what you understand. MARCH gives you a reliable framework to fall back on, one that has been proven to work in the worst conditions.
At the end of the day, this is about being able to step in when it counts instead of standing there unsure of what to do.
Jason Marsteiner is the founder and lead instructor at The Survival University, where he’s turned his obsession with staying alive into a mission to teach real-world survival skills. Forget fancy gear, Jason’s all about the know-how that gets you through the wild or a city crisis. A published author of Wilderness Survival Guide: Practical Skills for the Outdoor Adventurer, he’s distilled years of hard-earned wisdom into lessons anyone can use.
Raised in Colorado’s rugged mountains, Jason’s survival chops were forged in the wild—from Missouri forests to Arizona deserts to Costa Rican jungles. He’s navigated it all with next to nothing, earning creds like Wilderness First Responder (WFR) and SAR tracking along the way. He’s trained thousands to keep cool when 911’s out of reach, proving survival’s not just for grizzled adventurers, it’s for hikers, parents, and city slickers alike.
Jason’s mantra? Everyone should make it home safe. When he’s not running courses, he’s designing knives, mentoring newbies, or chilling in the city like the rest of us, always sharpening the skills that turn panic into power.