Cart
9 min read
How to Make Wool Boot Inserts for Warm Feet on Winter Hikes and Outdoor Adventures
DIY Wool Boot Liners: Keep Your Feet Cozy in the Cold
Winter in Colorado can be beautiful, but it can also be tough on your feet. Whether you are hiking, camping, bird-watching, or taking part in one of our winter survival classes at The Survival University, keeping your feet warm is a must for staying comfortable and safe in the cold. One great way to ensure your feet stay cozy during your outdoor adventures is by making your own wool boot inserts. These simple inserts are perfect for winter activities and adventures. They are also easy to make and budget-friendly!
Why Wool?
Wool is an excellent material for keeping feet warm because it is natural, breathable, and moisture-wicking, which means it pulls moisture away from the body. On top of that wool helps regulate body temperature and retains warmth even when it gets wet, plus it can actually absorb moisture to one-third of its weight without feeling wet. When it is drying, wool actually releases heat, and when it is dry it has springy wool fibers that create more air pockets and hold in your body heat. Aside from its wicking and warming properties, moisture causes the creatine and lanolin in wool to undergo a chemical reaction that breaks down the body’s secretions. This reduces odors and other issues caused by bacteria. All of these things make wool the perfect choice for outdoor adventures in cold weather. By making your own wool boot inserts, you can save money, capitalize on all of wool’s many benefits, and customize them to fit your boots perfectly.
Materials You’ll Need: (Note the first version does not require all of these, but the nicer version does.)
- Wool Fabric (old wool sweater, blanket, or purchased wool felt)
- Scissors
- Needle and Thread (strong, durable thread)
- Measuring Tape or Ruler
- Pen or Chalk (for marking)
- Cardboard (for creating a template, optional)
How to Make Wool Boot Inserts, Simple Version:
I prefer to use wool from past projects or from old blankets, but I know not everyone has these lying around the house. My buddy Creek Stewart likes to make his out of wool felt. Felt is an easy-to-find, and inexpensive fabric made by matting and compressing material fibers until they become one solid bit of material. You should be able to find wool felt at most places that sell fabric, my Walmart even has it sometimes.
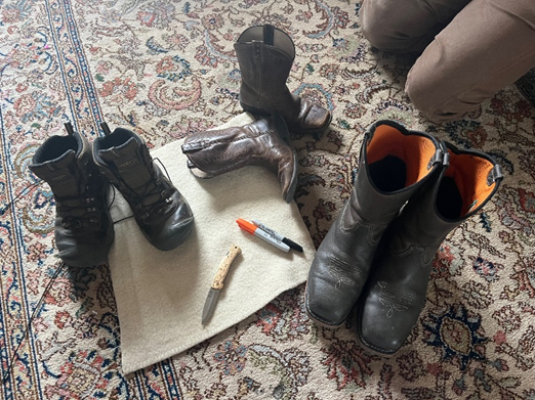
- Lay out your wool scraps or wool felt on the floor.
 Both wool scraps and wool felt work well for this project.
- Pull the shoe insoles out of your shoes or boots.
- Trace around your existing boot inserts. Make sure to do one for the left and one for the right foot.
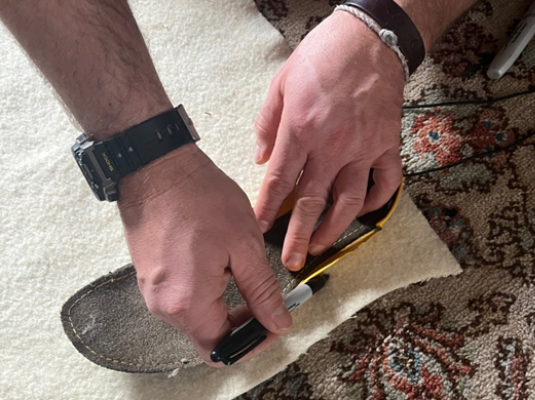
Trace as close to the insole as possible, be careful not to bend or change the shape.
- Use a good pair of scissors to cut around this traced line.
- Replace your original boot insert in the boot
- Put your new wool insert into your shoes or boots directly on top of the old insert.
- A great way to do this is to roll your new wool insert up from heel to toe. Then place the roll into the boot at the toe and unroll from toe to heel.
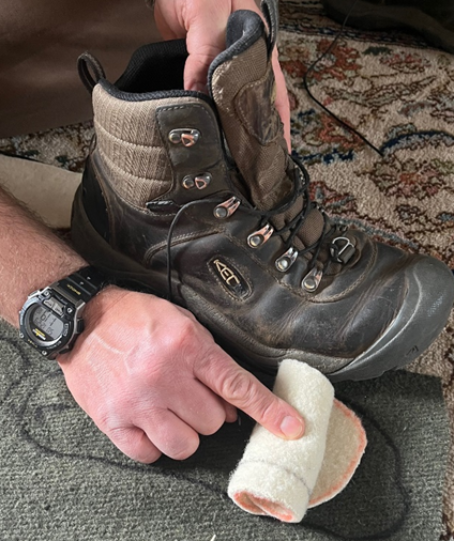
Roll up the ball from heel to toe, insert and unroll from toe to heel.
How to Make Wool Boot Inserts, Nicer Version:
There is nothing wrong with the quick version, but this version gives us a little bit more in both the comfort and warming department. The nicer version is also a bit more of a durable long-term solution to the comfy warm feet issue.
- Create a Template
The first step is to create a template for your boot inserts. Place the insole of your boot on a piece of cardboard and trace around it. Cut out the shape to use as a template. If you do not have an insole, you can also trace your foot directly onto the cardboard. The idea is to create a pattern that fits inside your boot comfortably. If tracing around your foot, make sure to put on your fluffy wool boot socks before you trace.
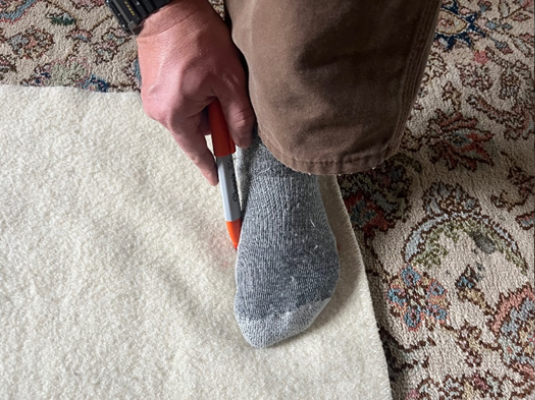
If tracing from your foot, put on the same type of socks you wear in your boots. Smooth out all the wrinkles, and trace right at the edge of your sock.
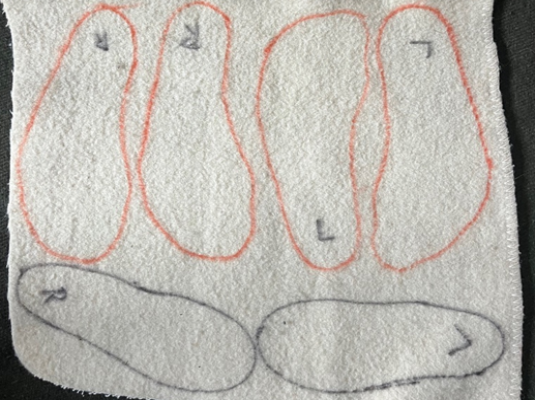
Take time placing your pattern, or foot, on to your scrap and you will get several insoles from even small bits of scrap.
- Cut the Wool
Lay your wool fabric flat on a surface and place your cardboard template on top. Do your best to stretch the fabric out and smooth out any wrinkles. Use a marker or chalk to trace around the template onto the wool. Cut out the wool shapes, making sure you have at least two pieces for each insert. You will be using two pieces to make one insert and you need two inserts (one for each foot). You may want to cut an extra layer for added warmth, especially if you will be in extremely cold conditions. I use the two-layer most of the time, but I have a four-layer for the boots I wear while teaching for The Survival University during the depth of winter.

If mixing and matching, make sure the highest quality wool is the layer touching your foot. It is not a bad idea to mark left and right feet too.
- Sew the Layers Together
If you are using two layers of wool, stack them on top of each other and sew around the edges to keep them together. You can sew by hand with a simple running stitch or use a sewing machine if you have one. Be sure to leave the edges slightly raw, as this will help prevent the wool from slipping around inside your boot.
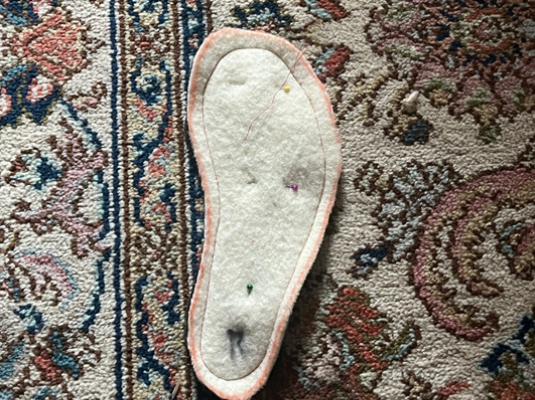
Take the time to flatten out any wrinkles and pin your two layers together. We do not want to create any friction spots that might bother or damage our feet.
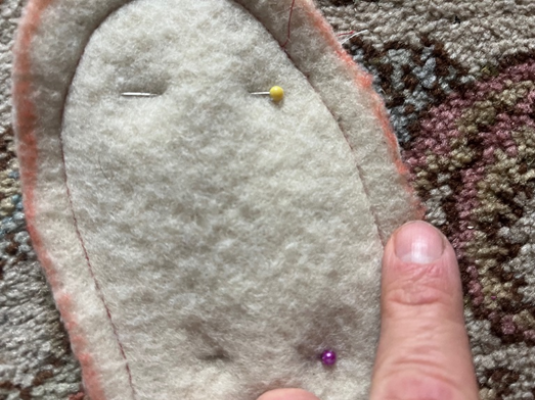
Do not sew right up to the edge. A little fraying is actually good to hold the insoles in place. You also want to leave about a fingers bit of space, in case you need to trim and adjust later on.
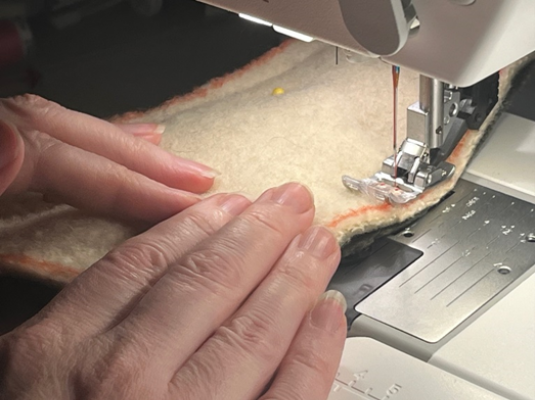
You can hand sew or use a machine, just make sure you do not create any bumps or friction spots.
- Add Extra Comfort (Optional)
For extra cushioning, you can add a thin layer of foam or felt between the wool layers. This will give your feet more comfort during long hikes or outdoor classes. Just make sure the foam is thin enough to still fit comfortably in your boots. Also make sure that whatever layers you add, do not trap moisture. We want each layer to wick away moisture, insulate from the cold, and allow vapors to leave. A layer of Tyveck might seem like a great idea for waterproofing, but it will trap in moisture and vapor which will freeze, make your feet sweat, and freeze some more. - Test Fit and Adjust
Once your wool inserts are ready, place them inside your boots and try them on. Walk around for a few minutes to make sure they fit well and feel comfortable. If they are too thick or too thin, trim the wool or add more layers to get the perfect fit.
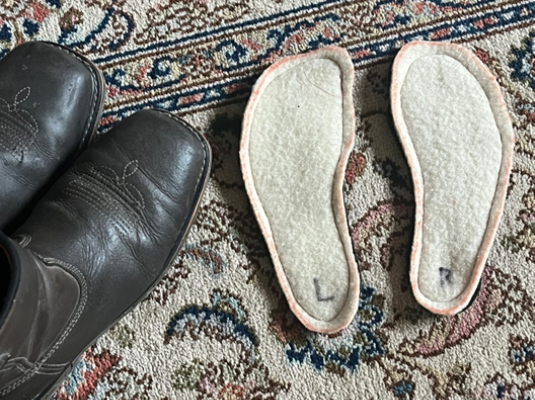
As an added bonus you can remove these inserts for drying and even move them from shoe to shoe for comfort.
You now have an extra layer of comfy soft wool, like walking on a survival cloud, that will insulate your feet from conduction with the cold ground.
Wrap Up: Warm Feet, Better Adventures
Making your own wool boot inserts is a simple, practical, and cost-effective way to stay warm during your winter outdoor adventures. Whether you are attending one of our winter classes at The Survival University, camping with the family, or just enjoying a winter hike, wool inserts can make all the difference in keeping your feet warm and comfortable. Try making them yourself for your next outdoor trip, and let us know what you think of them.
If you are interested in learning more survival skills, including winter preparedness, be sure to check out our upcoming classes at The Survival University. Stay warm, stay safe, and enjoy the winter wilderness.
Remember, even if you are just standing in line for holiday shopping with warm and comfy feet, there is no such thing as a small adventure.
Stay safe out there, I’ll see you on the adventure trail,
Hutch
Instructor Bio:
Aaron “Hutch” Hutchings is a seasoned survival, bushcraft, and wilderness living instructor with years of experience both as a student and a teacher. He is the owner of Ready Set Adventure Box (www.readysetadventurebox.com) and serves as a lead instructor at The Survival University (www.thesurvivaluniversity.com), where he teaches both beginner and advanced courses, as well as runs youth and family programs. Hutch has studied under some of the biggest names in the survival industry, and has even worked with a few of them directly.
A former Marine and lifelong Boy Scout, Hutch grew up immersed in outdoor skills, thanks in part to his grandfather, another outdoor instructor who used training with survival legends as rewards for achieving goals. Hutch is also the author of four books and brings a unique perspective to his teaching as someone who is autistic. His passion for survival skills and outdoor education shines through in every class he teaches.
If you are interested in learning more about survival gear or would like to explore the wide range of classes available, visit The Survival University at www.thesurvivaluniversity.com. Stay sharp and stay prepared for whatever wilderness adventure lies ahead!
Leave a Comment
What Nash Quinn’s Disappearance Teaches Us About Being Ready for the Backcountry
Nash Quinn vanished on a routine ride near Laramie. His story is a powerful reminder of why preparation, communication, and humility in the outdoors matter...
Recommended Gear List For Courses
Colorado is a cold weather climate most of the year and with our survival school at 9400 feet, it can get frigid at night, even…
Survival Training Near Me: Why the Best Might Be Worth the Trip
Discover why the best survival training might mean leaving the city. Explore The Survival University’s 4000+ acres and 20+ expert instructors!
Bugging In Guide Part 1: Drain Your Water Heater
Learn how to access hidden water in your home by safely draining your water heater during emergencies. A must-read for urban survival and bugging in.
Flint Knapping for Beginners: My Hilarious Failures & How to Do It Right
Flint knapping sounds easy—until you try it. Here’s my journey of frustration, flying shards, and why some people (but not me) make it look effortless.
What to Do When You Encounter a Wolf in the Wild
Wolves are neither villains nor heroes—they’re survivors. Explore their role in nature, the myths that surround them, and what we can learn from their resilience.


