Cart
Sub-Total: $0.00

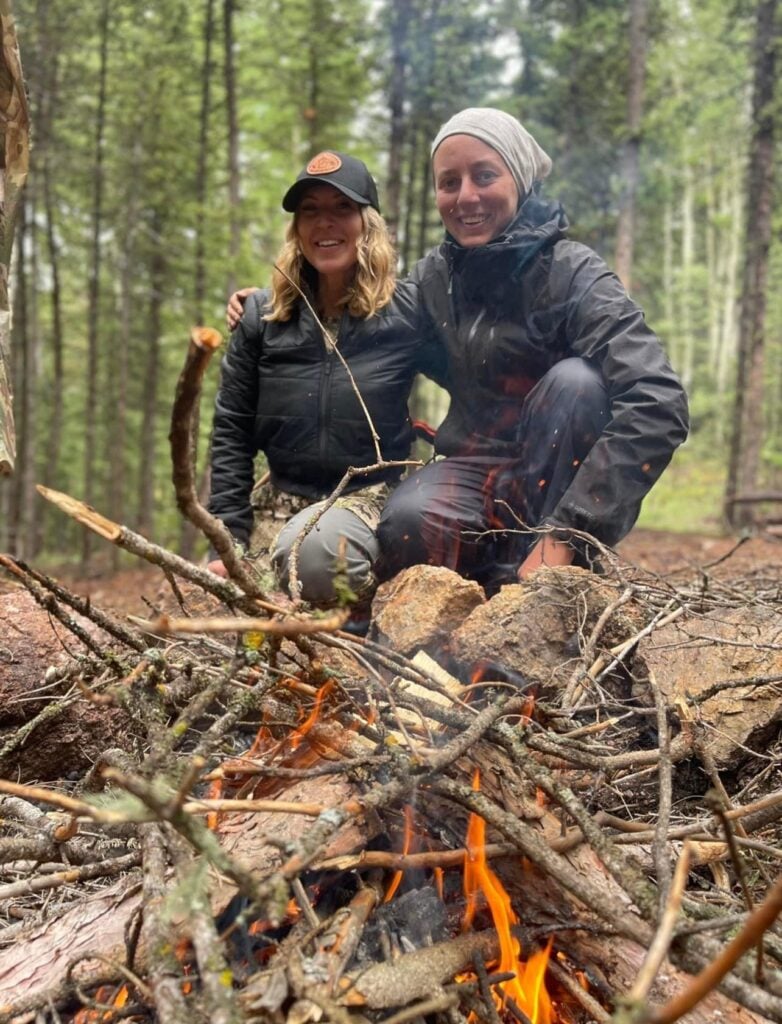
A group of friends decided to go camping in the woods. They set up their tents, cooked dinner over a campfire, and sat around the warm flames as the stars came out.
One of the friends, who was a great storyteller, began to spin a tale about a dragon that lived in the nearby mountains. The group listened in awe as the storyteller described the dragon’s fiery breath, glittering scales, and hoard of treasure.
Just as the story reached its climax, a log in the campfire shifted, sending sparks flying into the air. The friends all jumped, but then burst out laughing as they realized it was just the fire.
Feeling mischievous, one of the friends added a few twigs to the fire and said, “What if the dragon were to come down from the mountain and visit us right now?” The group fell silent for a moment, imagining the fearsome beast appearing in front of them.
But then someone else chimed in, “Nah, he probably wouldn’t want to leave his treasure behind.” And with that, the group settled back into their seats, continuing to joke and laugh as they took turns sharing stories and making s’mores under the stars.
From that night on, whenever they sat around a campfire, the friends would always remember the tale of the dragon and the fun they had together in the woods.
Whatever your story may be, many of them start around a good campfire. Other than a good place to tell stories, a good campfire brings warmth, food, water, moral boosts, entertainment, light, protection, the ability to signal rescuers and more. Being able to start a fire expediently and proficiently is a valuable skill to have. I find it to be one of the most enjoyable skills to teach and for my students, one of the most exciting to learn or become better at. Remove some modern devices and introduce subpar fuel (like you may have in a survival situation) and people find this enjoyable experience to be a little harder and more frustrating than they expect. By learning how to build a fire in unfavorable conditions, every other fire starting situation you face becomes easy.
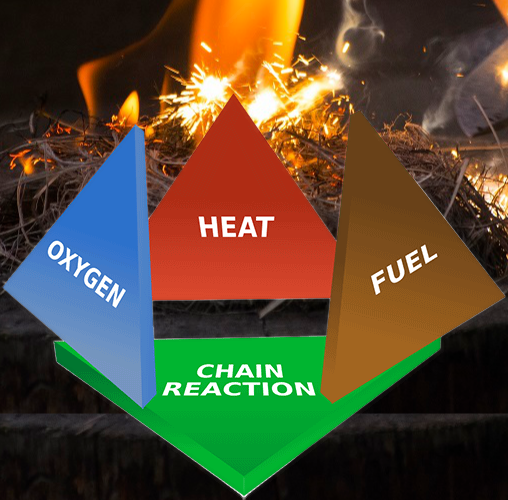
Dragons are fun but let’s get a little “sciency”. Fire is a chemical reaction that occurs when three elements are present: fuel, heat, and oxygen. A fourth element that is a necessary component of fire is a chemical chain reaction. This is called the fire tetrahedron. The heat causes the fuel to reach its ignition temperature and vaporize. The vapor mixes with oxygen in the air and starts a chain reaction called oxidation. This process releases heat, light, and gases, which continue to fuel the fire. The reaction will stop when one of the elements is removed, such as the fuel running out, the oxygen being depleted, or the heat being extinguished.

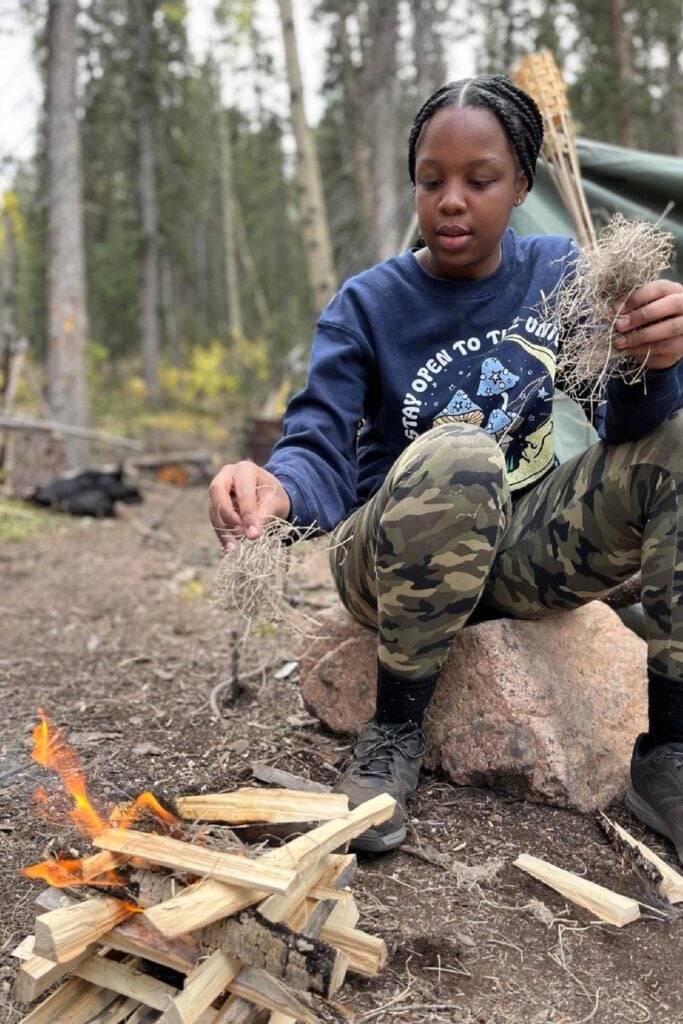
Now let’s talk about the very basic anatomy of a fire lay. Tinder is material such as fine grass, fibrous tree bark, cotton balls or any material that is almost hairlike, that ignites very easily. When it’s dry, if you can’t ignite it with a spark from your ferro rod or from flames from your lighter in a second or two, then it is kindling. Kindling is small sticks that burn more slowly. I tend to think of kindling as bits of wood that are the diameter of a pencil lead up to the diameter of a full pencil. Anything larger requires more energy or heat to burn, therefore I consider them less valuable until later in the fire building process. Always start with tinder and then work your way up in size of kindling until you have enough energy to start larger sticks or logs on fire.
Over the years teaching survival skills and how to build successful fires, I find that the most common mistake is for people to deplete the oxygen needed. People tend to put too much kindling on the fire too fast, or use pieces of wood that are too large from the very beginning. Furthermore, we typically like things neat in our lives so people tend to build nice, neat, pretty lays by breaking their kindling down into short uniform sticks and then laying them down in an organized manner over their tinder. Doing so quickly smothers the fire because of the lack of air gaps.
A term I like to use and one that you should remember is, Fire Loves Chaos!
You can create chaos for your fire by keeping your kindling at least a foot long and by leaving any small twigs attached to the main branch. And by branch I don’t mean a wrist sized chunk of wood, I mean a branch that is roughly the diameter of a pencil.

Another mistake I see people make, when it comes to oxygen, is blowing on a small flame in hopes of making it larger. What happens when you make a wish and blow on your birthday candle? Enough said! Don’t blow too soon or too hard. Give that flame time to produce heat! Carefully add fuel if necessary but don’t blow the flame out.
The second most common mistake is that people do not gather enough tinder or kindling before they try to start their fire. Always gather more than you think you need, especially in a survival situation because it is going to burn up fast. Ideally you should have enough tinder to create the size of a basketball when the tinder is packed tight. You aren’t going to use all of this at once though and you aren’t going to keep it in a tightly packed ball. Remember, fire needs air! So when it comes time to ignite that tinder, fluff it up to introduce air pockets. It also needs fuel so make sure you have more than you need. I can’t stress this enough!
Next you should gather enough kindling to fill your arms or a decent sized backpack. I commonly see people gather only a football sized bundle of kindling and then they are scrambling because this is not enough fuel to start larger sticks on fire. Gather more than you think you need! Yes, I said it again because it’s just that important.
Once you have a large ball of tinder and a big bundle of kindling then head back out and gather larger chunks of firewood. Think thumb sized up to wrist size and keep them long too. So long as you are in a safe area to build a fire, there is no need to break down your firewood into short segments. Keep them several feet long. There is nothing wrong with throwing a six foot branch on your fire, so long as it doesn’t create a tripping hazard but more importantly so it does not crush your structure and deplete the oxygen. The center of that long stick will burn up and then you can toss the ends into the flames. Survival is a lazy man’s game. Let the fire cut the sticks for you.
Now that you have the basic concepts of starting a fire, let’s briefly go into a little more detail on fire lays. An important thing to know is that starting a fire and maintaining a fire are two different skills. Continue reading to find a couple popular methods of starting a fire as well as methods to maintain a fire. Though they are all grouped together as different fire lays, “starting” and “maintaining” really are two different skills.
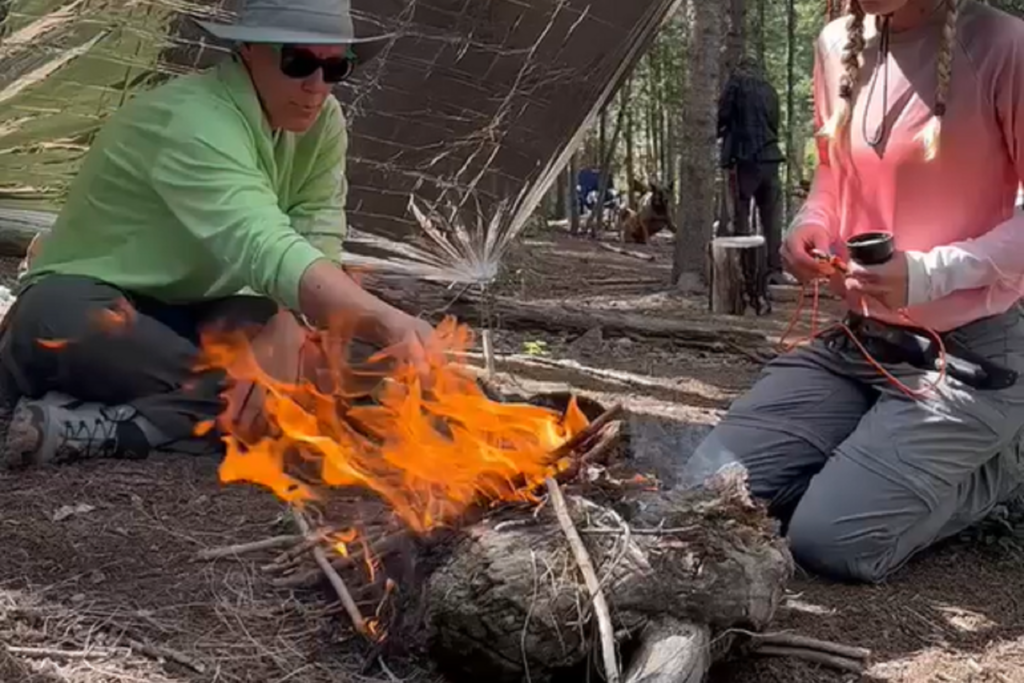
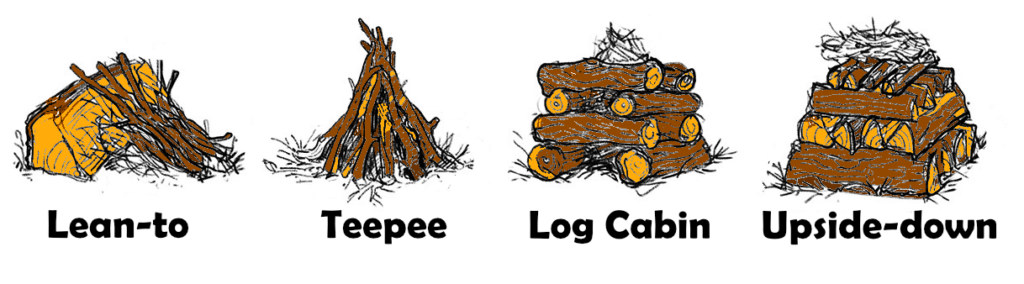
A fire lay that’s great for starting fires in windy conditions, as it provides shelter from the wind. Really it’s a great lay to use any time because it’s simple, yet effective. If I need to get a fire going fast, this is the method I use. No use in overcomplicating things. To create this lay, place a large log or rock on the ground. Large in diameter, not length. This log or rock should stand 8-12 inches off the ground. Next place a lofty/airy ball of tinder on the ground next to the log/rock and then ignite it with your ferro rod or lighter.
If the ground is wet then first put a thin platform of sticks on the ground beneath the tinder. Once the tinder starts to burn, lean kindling against the rock and ground, creating a lean-to shelter over the flames. Continue to feed small amounts of tinder and kindling in a chaotic manner until there is enough energy to ignite thicker portions of wood. If your flames start to go out, feed small amounts of tinder underneath the lean-to that you created. Remember, tinder is hair-like fibers. Don’t stuff kindling into flames that are going out.
A classic fire lay that’s easy to build and provides quick ignition. That’s a lie! This structure can be frustrating to build, which is why I don’t use it. I see person after person spend a considerable amount of time trying to build the perfect teepee, only to have it fall over because the structure isn’t sound. It is not a lay that I use often, but since a lot of people like to use it, I will talk about it. This fire-building technique creates a small, conical structure using kindling and tinder. To build a teepee fire lay, you’ll need a bundle of kindling, a bundle of tinder (dry grass or other fibrous tinder material), and a fire starter such as a ferro rod or a lighter. Arrange your kindling in the shape of a teepee over top of your tinder, with the larger sticks on the outside and the smaller, dry twigs and kindling in the center. Light the tinder in the center, being careful not to knock over the teepee. Watch as the fire burns upwards through the tinder and smaller kindling, igniting the larger sticks on top.
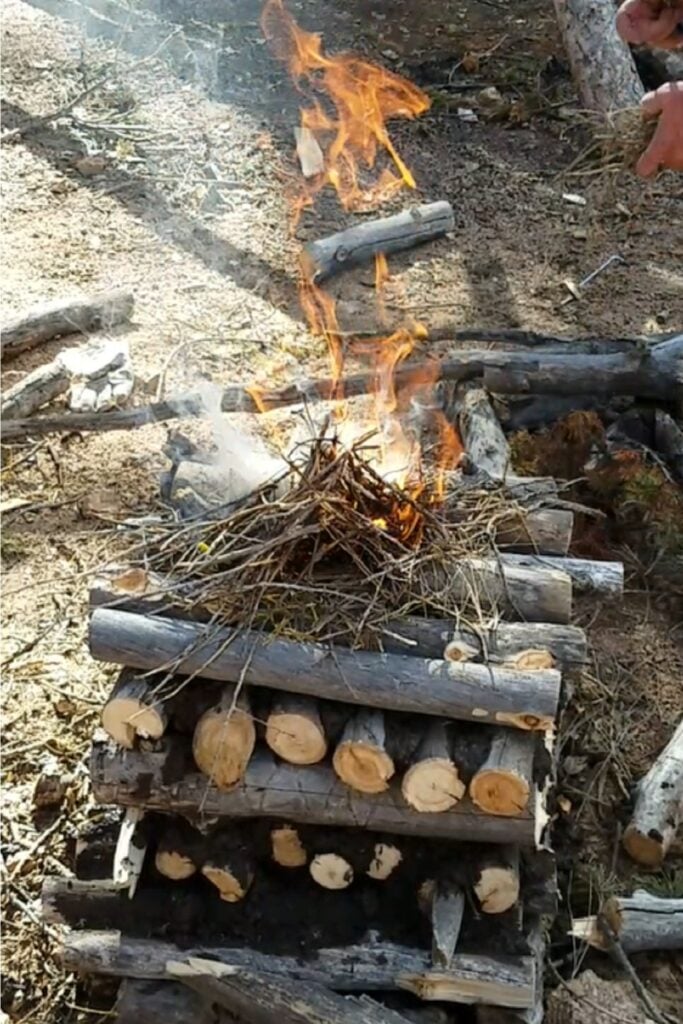
The log cabin fire lay is another technique used to start a fire but takes a bit more work. It is a great foundation to start a longer, sustainable fire. Traditionally it involves building a teepee fire lay first and then placing larger logs arranged in a cabin-like structure around the teepee. The teepee provides initial ignition and the logs arranged in a cabin-like structure help to sustain the fire. The log cabin is efficient and allows for good airflow, promoting a strong, hot fire that will quickly ignite larger logs. However, since I am not a fan of the teepee fire lay, I skip that step and simply put tinder inside of the structure and ignite it. I continue to add small amounts of tinder to the fire until the log cabin flames are self-sustainable.
For a small, hot log cabin fire that burns quicker, use smaller sticks that are 12-18 inches in length. By splitting large logs down to thumb size diameter sticks, you will expose the inner dry portions of wood and create more surface area in a smaller fire lay. The fire will generate a lot of heat to warm you quickly, boil enough water for a meal and warm your hands, in a short amount of time. To create this lay, stack two split sticks parallel to each other on the ground about eight inches apart from one another Then place two more split sticks at right angles on top of them, alternating sides, again at about eight inches apart.
Repeat until the desired height is reached. I usually stack until the structure is about ten inches high. If the ground is wet or snow covered, use sticks to build a floor or platform before starting to build your cabin structure. Instead of a teepee in the center of the log cabin, use loosely bundled dry grass and ignite it. Don’t smash the grass down as this reduces oxygen. Continue to add small bits of dry grass until the sticks of the log cabin ignite and stay burning. Add more fuel as needed.
Upside-Down Fire Lay: A fire lay that burns slowly and steadily, and is great for overnight fires. This structure is more about maintaining your fire rather than starting it. To create this lay, start by gathering a large amount of logs and cut them into two to three foot sections. Ideally you want them all to be similar in diameter. Start by placing your largest logs parallel to each other, sides touching, on the ground until you create a solid square platform. Then stack smaller logs perpendicularly on top to create a new platform level. Each new level should be placed in a perpendicular direction from the last. To slow down the rate at which this fire burns, place mud in between the logs on each level.
This mud goes on the sides of the logs, between them, not on top of the logs. The mud helps keep hot embers from falling between the logs to the levels below. Repeat until the desired height is reached, then place kindling on top of the logs. Placing a lean-to or small teepee fire lay on top of the upside-down fire is oftentimes a good way to get the fire going. Light the tinder and kindling on top of the structure and allow the fire to work its way downwards, igniting the larger logs.

Now that you have learned how to start a fire and a few fire lays to maintain a strong fire, let’s talk about how to preserve your fire without consuming all of your fuel. This is a technique I learned well when I was in my late teens. In another lifetime I ran a coal fired steam locomotive as a tourist guide. At the end of the day I would make sure I had a bed of hot coals. I would then shovel all of the hot coals to one side of the firebox.
Next I would fully cover these hot coals with 15 or so shovels full of new coal, close the firebox door and then shut all the valves that fed air into the firebox. This would allow the fire to smolder all night long and keep the water in the boiler warm until I returned the next day to fire things up again.
Banking a campfire is almost the same method as it involves partially covering the coals and ashes with dirt, sand, or ash to reduce air flow and oxygen. This helps to prevent the fire from burning too hot and too fast, while also preserving the coals so that they can be easily reignited the next day. To bank a campfire, pack your hot coals and ash tightly together in a small area. Add logs, tightly packed on top of the hot coals. Make sure there are no large air gaps.
Push more ash up around the edges of the logs and coals and then simply spread a layer of dirt or sand over the ash, coals and logs, leaving a small portion exposed to the air. This reduces the oxygen but does not eliminate it, causing the fire to burn through the fuel slowly. I recommend you test this out next time you go camping.
It’s important to completely extinguish the fire before leaving the area and to never leave a fire unattended. Extinguish a campfire correctly by drowning it with water, stirring it thoroughly with a stick and then drowning it again. You may need to repeat this process a few times if your fire has been burning for a long period of time.
There are countless other fire lays including the star fire, long fire, fire dog, Cheyenne fire wall, and Belmore lay, each with their own pros and cons. But that is a story for another time. Get out there and practice your fire starting techniques. I suggest you do it in unfavorable conditions and if you struggle whatsoever… good! Because that is how we learn. If you want to shorten that learning curve, then come on out to one of our classes!
Did you like these survival tips? Check out more tips and trick on our Wilderness Survival Tips page.
If you are looking for hands on training to learn more about wilderness survival and want to take months if not years off of your learning curve, I suggest you check out our 5 Day Outdoor Survival Basics 101 class!
#survivalskills #survivalgear #wildernessculture #outdooreducation #wildernesssurvival
Many stories start around a good campfire. Other than a good place to tell stories, fire brings warmth, food, water, moral boosts, entertainment, light, protection,...