Cart
Sub-Total: $0.00
9 min read

Welcome back! A few weeks ago, we talked about the importance of carrying at least a small kit with you on your adventures. In the (Link to my three-day basic.) we spend a great deal of time looking at different types of kits: back home, bug out, Altoids, EDC, non-consumable, etc. With each style we like to talk about choosing gear, how to use the gear, and what to do should you lose or break your gear.
CLICK HERE FOR FULL LENGTH HOW TO VIDEO
Today let’s look at replacing your whistle in an easy and highly effective method. There are a great many whistle hacks out there, but with the ones we choose here are the criteria:
1. It must actually carry over distance to be viable. If you cannot hear it across a soccer field or at least down the block, then it is not actually useful.
2. It must be super quick to make, otherwise, we can just carve a quick whistle or other sound device.
3. It must not resemble an injured animal call! This is important, many of the whistle hacks I see online are actually used by hunters to bring in predators for hunting. Not a good idea if you are hurt.
The aluminum can whistle absolutely meets all of these criteria.
Before we go on, a quick note on using trash for gear.
As a naturalist I hate litter, but as a survivalist, it can be extremely valuable. Never step over a broken lighter while looking for your bow drill kit. Look at trash the same way you would other resources in the field. Be a modern primitive and use whatever you find to effect what you need.
Before you start cutting up or otherwise using your trash, take a few moments to prioritize your situation.
For example, we can make a great lantern from an aluminum can, but is this a good idea? It depends. Did we break or lose our light but have the rest of our gear? In that case, “MacGuyvering” a lantern not only makes sense, it is downright awesome. On the other hand, if we are in an actual bad situation and we do not have our water container, cutting up that can to make a lantern rather than using it to start a fire and boil water….well that is not a good idea.
We also want to make sure we are not damaging ourselves or our gear in order to pull off some of these hacks. Knife safety is a must; carefully plan how you cut or alter gear. A cut, shard of glass in the eye, or broken foot could change your situation drastically. Once you are sure using the found item for a certain skill is a priority, think through the most efficient and safe way to process it.
On top of that use your knife, or other tool, in a way to minimize damage. For example, when cutting an aluminum can, I could safely choke way up on my knife blade and repeatedly scrape back and forth, scoring the can until it cuts. In this way, I am safe and do not damage or dull my blade. For that matter, I could use just a sharp rock to repeatedly score the can until it cuts too.
We intend to address as many hacks and cheats as possible as we progress on the adventure, but for now, hold those basics in mind and let us make a loud, easy whistle.
Water and air move trash to the darndest of places. One of the big perks of my job is that I get to travel to some incredibly remote places. I have never been anywhere on this planet that did not have at least some type of human trash. Heck, we have not been on Mars yet, and already we crashed something and left trash there.
Should you be lucky enough to find an aluminum can, you can follow these steps exactly. It should be noted that sound is just the vibration of air and many other materials will also work with this method of making a whistle, even some barks, but we will leave it to you to experiment until we can spend some time together around a campfire.
Steps: This is harder to explain than to do, for extra detail check out this short video we made. (Link to video I am about to make and send to you.)
1. Find an aluminum can.
2. We need a strip of can or other material that is about the length from your knuckle to the tip of your booger finger. It needs to be the width of this same finger from the first joint to the second. Different-sized hands will have different-sized whistles and that is actually a benefit when it comes to holding and blowing later on.
3. If you used the rock scoring method, or for any other reason have a sharp or snaggly edge, take a moment or two to abrade the sides with a rock to dull and smooth out your little rectangle.
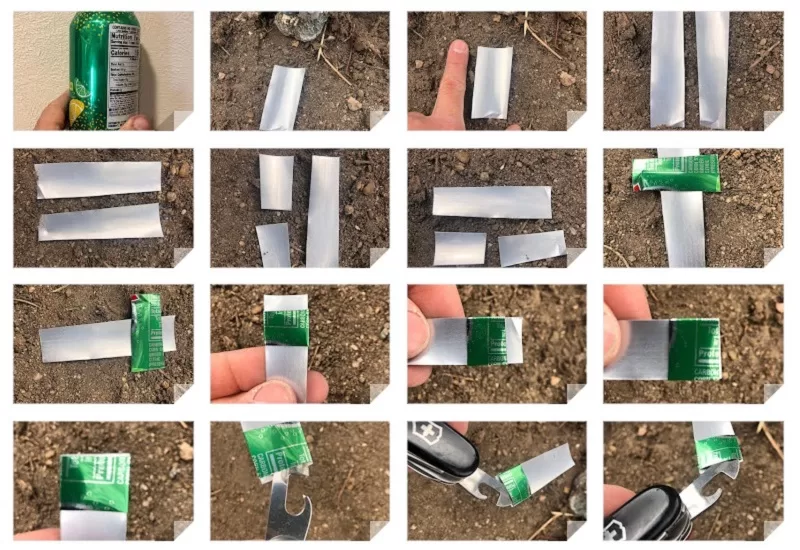
4. Now we will cut this rectangle almost in half. Find the halfway point and then move just a bit to the left or right. The end result is one piece will be just a little less than half and the other will be just a little bigger.
5. Cut the thinner piece in half.
6. Take this smaller piece and place it on top of the larger piece to make a sort of lowercase t. Notice in the picture that we left a little bit of extra of the bottom piece showing. This is important.
7. Fold the top piece down on both the left and right sides around the bottom piece.
8. Remember that overhang? Fold it down over the two pieces you just folded. The pictures should make this easier to follow, but remember we have that short video that goes step by step looking directly at my hands. (another link to the new video so they do not have to scroll if confused.)

9. Before we go any further, take a moment to open this little envelope you made. You just have to put a stick, rock, or the tip of your knife in and wiggle a little. This step will be the difference between a sort of whistle, and one that makes you wish you had earplugs in.
10. Now fold this “envelope” down to form a 90-degree angle with the rest of the tail.
11. Grab a stick, or just roll slow, and roll this “tail” up towards the bend you just made.
12. Now, the hardest part is to hold this in such a way that it resembles a referee whistle. You can carve a p (the small ball in some whistles is called a p) to go inside, but if you followed the steps this is completely unnecessary.
13. I like to hold the “tail” between my thumb and pointer finger. Leave a little gap between the “tail” and the envelope.
14. Blow like a regular whistle. If it is not crazy loud adjust your hand and the space just a bit and try again. This whistle should sound store-bought.
I teach a few different ways to make whistles in my classes because the whistle is such an underrated and important part of real survival gear. To get help, simply blow three steady blows, wait three seconds, and blow three more times. Repeat this for a while every hour or more often if you believe people are close. While you are counting between your three bursts of blowing, make sure to listen for someone signaling you back. The moment you hear someone, turn your body in that direction and continue to signal. It is often hard for SAR to pinpoint the exact direction of sound in the woods.

If you have little adventurers this can not only save a life, but it can fill an afternoon in the front yard or park. As part of our literacy outreach, we combine this with the story of the boy who cried wolf. Make sure they know about blowing three times and only do it when it is a real emergency. Otherwise, some weirdo like me may come crashing through the woods right into your barbeque, true story.
I hope you can come out to the class and spend some time carving whistles and other stuff with me, but if not try some of our instructor-in-a-box adventures around your backyard. ( https://www.readysetadventurebox.com/free-adventure-skills )
Remember, even if you are just talking to the neighborhood with your new super loud whistle, there is no such thing as a small adventure.
Stay safe out there, and for goodness sake carry a whistle.
See you on the adventure trail,
Did you like these survival tips? Check out more tips and trick on our Wilderness Survival Tips page.
If you are looking for hands on training to learn more about wilderness survival and want to take months if not years off of your learning curve, I suggest you check out our 5 Day Outdoor Survival Basics 101 class!
#survivalskills #survivalgear #wildernessculture #outdooreducation #wildernesssurvival
Learn how to make a super quick and highly effective whistle hack that carries over distance. Prioritize your situation and ensure safety when processing found...
A great “in between adventures” project is to make some wool insoles for your boots. You can use scraps from our other projects or swing...
I really like the idea of making this whistle, do you by any chance have a pdf file that I could download
Glad you liked the idea! I don’t have a PDF available at the moment, but I’ll keep that in mind for the future. Thanks for checking it out and for your interest!